
Overview
Home >> Settings >> Products/Services >> Packages
In the Packages section, you can create new product packages, product groups and product plans and also make changes in existing plans and packages and delete them. |
To access the Packages section:
- Go to Settings.
- Select Packages in the Products/Services section.
In the Packages section, the details about the existing packages/plans are listed under the name of its Product Group with details in the below given sequence.
Name of Product(Plan/Package Name) – Type of Payment (One Time/Recurring) – Type of Product – Applicable on Partner Website (Enable/Disable) – Status (Active/Inactive)
The Applicable on Partner Website section, allows you to manage what products and services will be displayed on the main company's partner website. If the button is ON, this means that the main company's partner can sell this product/service through his marketplace and if the button is OFF then, the selected product/service will not be displayed on the main company's partner's website, |
See a sample screenshot of the Packages section:

Home >> Settings >> Products/Services >> Packages
To view only the active Plans and Packages:
- By default, only active plans/packages are displayed in the Packages window.
View All and Show Active buttons can be enabled one at a time, so only one is visible at a time. View All shows all active and inactive (hidden) plans and packages, whereas Show Active button only shows the active plans and packages. |
- If you are in the View All window,click on the Show Active button to view only the Active plans and packages.
See sample screenshot of the Active Plans and Packages section:

Home >> Settings >> Products/Services >> Packages
To view All the Plans and Packages including the Inactive and Hidden ones:
- Click on the View All button in the Packages window.
See sample screenshot of the View All Packages section:

Note For Main Company' Partners The main company's partners can view only those products and services for which the main company has given permission to them. They can also set pricing for those permitted products. Price Setting for Partners Home >> Settings >> Products/Services >> Packages - Click on the Edit icon in front of any new product. - Here, you can see Your Price for the product. - Set your price and billing cycle in the provided sections. |
Home >> Settings >> Products/Services >> Packages >> Create a New Plan
To create a new Plan (Product Package):
- Click on the Create a New Plan button in the Packages section.
- This will open the Create a New Plan form, as shown in the screenshot below
- Select a Venture Type for which New Product Plan is being created.
- Select a Product Type under which New Product Plan is being created from the Product Type dropdown (New sub-fields might appear in the form depending upon the product type selected).
- Select Name of Product whose plan is to be created from the dropdown.
- Select a Product Group under which this New Product Plan is created from dropdown (All product groups appearing in dropdown must be previously created through Product Group- as explained below).
- From the Product dropdown list, select a Server Structure on which the new product plan is actually configured. This dropdown list shows server structures within their respective server groups.
- In the Plan Name field, enter a unique name for the New Plan being created.
- In the Order Type, select Order if products/services are ready to be delivered as soon as the payment & order processing is done. Select Pre-order if products/services are not readily available & need to be customized as per each order.
- Click on the Submit button.
See sample screenshot of the Create a New Plan section:

Note for Main Company's Partners The main company can add and create new products, but this option is not applicable for the main company's partners. |
Home >> Settings >> Products/Services >> Packages
In this section, you can make changes to the existing product details, like price, module, custom fields and a lot more. |
To edit an existing Product Plan (Product Package):
- Click on the Edit icon located in front of the Product Plan’s name that you want to edit.
- This will open the Edit Product Plan form with details of the Product Plan that you want to edit.
- Make the desired changes.
- If you want to hide a product plan from the order form, tick the “Hidden”checkbox.
- If you want to hide a product plan from the admin, tick the “Hide from Admin”checkbox.
- If you want to use manual invoice creation of a product plan, tick the “Manual Invoice creation “checkbox.
- If you want the product plan to be displayed on the main company’s partner’s website, tick the “Show on Partner “checkbox.
- Click on Save.
See Screenshot:

Home >> Settings >> Products/Service >> Packages >> Pricing
In this section, you can Edit the Pricing structure of the existing Product Plan. You can set the price based on different billing cycles like Hourly, 1 month, 3 months, 6 months and so on. |
To edit product pricing: - Click on Pricing tab on the Product details page. - This will open the Price Settings window. Here, you can define the Setup Fee of the product and the Price. The prices you set here will be displayed on the order page of the product plan. See Screenshot: 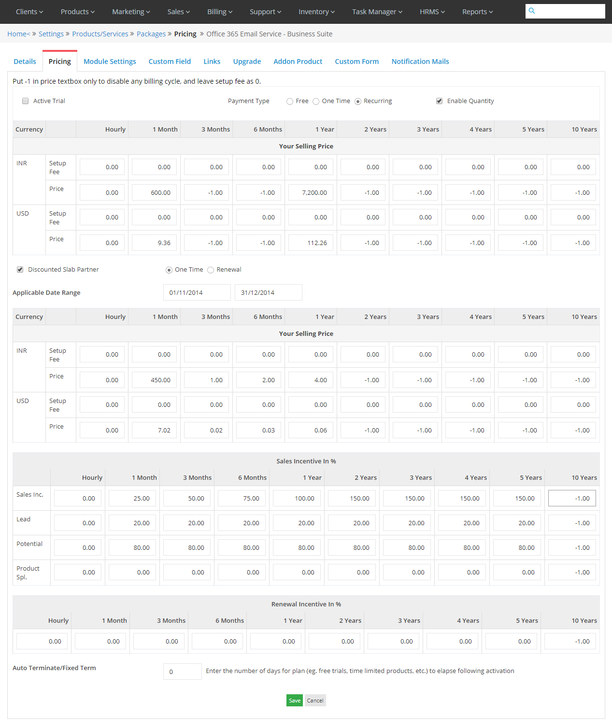 Here, you can perform the following functions. Set Payment Type: Select the payment type of the product- Free, One-Time or Recurring Set Active Trial: With the help of the Active Trial check box, you can define the trail period of the product. Tick the checkbox yes, and set the trial period in days. If you set the price -1, the particular billing cycle will not be displayed on the website for that product plan. The -1 need to be entered in the Price text box against the particular billing cycle, however, the Setup Fees need to be set 0 only.
|
To set discount on a product plan for a fixed period of time: - Click the Discounted Slab Partner check box, yes. - You can select whether it will be provided one-time or on renewal. - Define the Applicable date range of the discount. - Set the discounted price in the provided section. To define the Incentives on the sale of the selected product plan: - You can define the sales incentive for getting lead, potential and product specialty through this section. - Whatever Sales incentive you will set here, will be displayed under the sales report sections, in each account manager's ledger. - You can define the Auto-termination of the product plan in days post which the plan will elapse. |
Home >> Settings >> Products/Services >> Packages >> Module Settings
In this section, you can edit the module settings of the product plan, like its Name, Server Group etc. and also selects the mode of product setup from the available options. |
- Click the Module Settings tab. - This will open the Module Settings of the plan with already filled fields. - Make desired changes. - Select any available option for the automatic setup of the product. - Click on Save. See Screenshot: 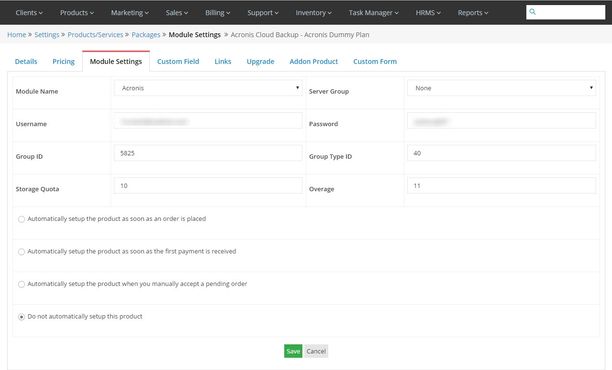 |
Home >> Settings >> Products/Services >> Packages
In this section, you can define the custom fields of the product plan. The custom fields are displayed in the client order section and a welcome mail including all the service details. |
- Click the Custom Field tab. - This will open the Custom Fields of the plan. Here the information is displayed in the following format: Order – Field Name – Filed Type – Description – Select Options – Admin Only – Required. See screenshot: 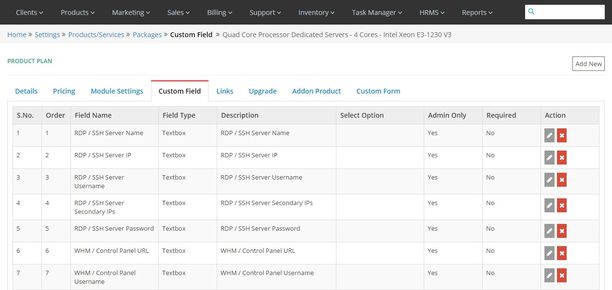 Home >> Settings >> Products/Services >> Packages >> Custom Field - Click the Add New button on the custom field page. - This will open the Add new Custom field window. - Enter the Order no, Field Name, Field Type, and Description. - Select whether Admin can only see it, through the checkbox. - Click on Save. See screenshot: 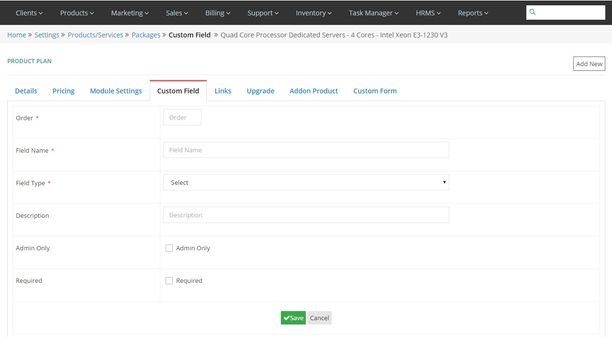 Home >> Settings >> Products/Services >> Packages >> Custom Field
- Click the Edit icon located in front of the custom field you want to edit. - This will open the edit Custom Field window with already filled fields. - Make desired changes. - Click on Save.
Home >> Settings >> Products/Services >> Packages >> Custom Field - Click on the Delete icon located in front of the custom field you want to delete. |
Home >> Settings >> Products/Services >> Packages >> Links
- Here, you can view all the links associated with a product plan. These links are generated when a customer selects a particular billing cycle.
See Screenshot:

Home >> Settings >> Products/Services >> Packages >> Upgrade
In this section, you can select the product plan which needs to be upgraded and select the type of mail to be sent to the client. |
- Click on Upgrade tab. - Select the Package Upgrade from the dropdown. - Select the Upgrade mail to be sent from the dropdown. - Click on Save. See screenshot:  |
Home >> Settings >> Products/Services >> Packages >> Addon Product
in this section, you can select the additional products/plans available with the main product package. |
- Click on Addon Product tab. - Select the add-on product group from the dropdown. - Select the add-on plans by checking the boxes. - Click on Save. See screenshot: 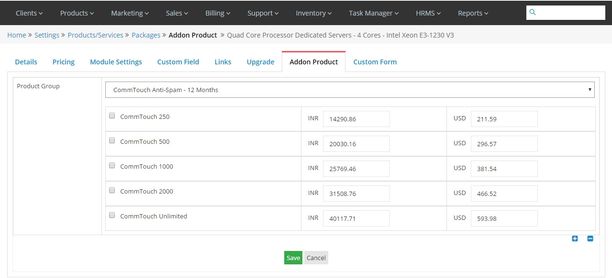 |
Home >> Settings >> Products/Services >> Packages >> Custom Form
In the section, you can define the custom form for a product or service plan. The client will provide the required data as specified in this custom form. |
- Click on Custom Form tab. - Define the Label ie. the field name. - Select the mode through which the label will be displayed, and the client will send the required data in the provided format. - Use the + sign to add more fields, and - to remove fields. - Click on Save. See Screenshot:  |
In this section, you can select the welcome mail template for the product/service which will be sent to the customer as soon as an order provisioning is done. It will include the entire details of the service. |
- Click on Notification Mails tab.
- Select the mail template from the Welcome Email drop-down.
- Click on Save.
Suspension and Termination of Services
Home >> Settings >> Products/Services >> General Product Settings >> Vendor >> Product Name >> Product Plan >> Notification & Action Mails
After Welcome Email, you will see two master tabs:
Suspension
Termination
Suspension:

Under this section, you can schedule ‘Notification & Action’ for suspension in the following manner:
In the ‘Notification’ section, provide a value, i.e. number of days depending on when you want to send service suspension notification to the client. The number of days that you enter will be considered on the basis of due date. For example, entering 1 on the days field would cause the notification to be sent 1 day after the expiration of due date.
In the ‘Action’ section, provide a value, i.e. number of days depending on when you want to suspend the services of the client as well as send a notification for the same. The number of days that you enter will be considered on the basis of due date. Entering 1 on the days field would cause the service to be suspended on the day entered in days field. Once service is suspended then, a report will be sent to Service Provider admin for Service Provider’s end customers and Partner for Partner’s end customers.
Termination:

Under this section, you can schedule ‘Notification & Action’ for termination in the following manner:
In the ‘Notification’ section, provide a value, i.e. number of days depending on when you want to send service termination notification to the client. The number of days that you enter will be considered on the basis of due date. For example, entering 1 on the days field would cause the notification to be sent 1 day after the expiration of due date.
In the ‘Action’ section, provide a value, i.e. number of days depending on when you want to terminate the services of the client as well as send a notification for the same. The number of days that you enter will be considered on the basis of due date. Entering 1 on the days field would cause the service to be terminated on the day entered in days field. Once service is terminated then, a report will be sent to Service Provider admin for Service Provider’s end customers and Partner for Partner’s end customers.
Home >> Settings >> Products/Services >> Packages
To delete an existing Product Plan (Product Package):
- Click on the Delete icon located in front of the Product Plan’s name that you want to delete.
Dependent Products
Home >> Settings >> Products/Services >> General Product Settings >> Vendor >> Product Name >> Product Plan >> Dependent Products

In the Dependent Products section, you can select Domain Options for the product/service mandatory on the marketplace. |
To select the Dependent Products:
- Click on the Dependent Products button in the Product Plan section.
- This will open two fields: Domain Mandatory and Domain Options.
Domain Mandatory: You need to check this checkbox to treat the domain as mandatory on other services and hosting order pages.
Domain Options: All domain options have been listed here. Select the domain options which you want to display on the marketplace.
- Click on Save button.
noteTo make a domain mandatory on the marketplace, you need to check the Domain Mandatory checkbox.
Domain options selected in Master will be displayed on the marketplace.
Existing Microsoft service customers won’t see domain options. There will be previously associated domain options for them.
If a customer has already added a Microsoft service in the cart, then the Microsoft domain will be displayed as autofill.
To make a domain mandatory on the marketplace, you need to check the Domain Mandatory checkbox.
Domain options selected in Master will be displayed on the marketplace.
Existing Microsoft service customers won’t see domain options. There will be previously associated domain options for them.
If a customer has already added a Microsoft service in the cart, then the Microsoft domain will be displayed as autofill.
These options are also available under MS Office 365 Products section.
- Go to Home >> Settings >> Products/Services >> MS Office 365 Products
- As shown in the screenshot below, there are Domain Mandatory and Domain Options fields for plan which can be imported.

Product Group
Home >> Settings >> Products/Services >> Packages >> Product Group
In the Product Group section, you can further segregate products within a product type. Product Groups are basically package names within which Plans are created. For example, categorization in Product Group can be done on Server Location basis – India, US, etc. |
To access the Product Group section:
- Click on the Product Group button in the Packages section.
Home >> Settings >> Products/Services >> Packages >> Product Group
To add a new Product Group:
- Fill in the required details in the Add Product Group form in the Product Group section as described below.
- Select Name of Product whose group is to be created from the dropdown.
- Enter Name of New Product Group for ex. Java Linux Hosting can be the name of a Product Group within Shared Hosting (Product Name), which is within Hosting (Product Type).
- Check mark Hidden if you want hide this Product Group so that Clients don’t see it while placing the order.
- Check mark Hide from Admin to hide the new Product Group from the Admins having permission for placing order on Client’s behalf.
- Select Tax Groups that would be applicable on products within this Product Group from the dropdown.
- Define the Estimated Delivery time for the product within this product group.
- Enter the Unit of Measurement for the particular product group.
- Mention the Service Accounting Code (SAC).
- Click on the Submit button.
See sample screenshot of the Product Group section:

Home >> Settings >> Products/Services >> Packages >> Product Group
In the Product Groups section, all the Product Groups are listed below the Add New Product Group form with details in the below given sequence.
- Product Group – Product Type – Tax Group – Status (Active/Inactive) – Sort Order (Order in which Product Groups are visible in the Member Panel).- Markup (in %) - Estimated Delivery time – UOM (Unit of Measurement) – SAC (Service Accounting Code)
The Markup section, allows the admin to add markup to any Dedicated/VPS/Cloud product group. The added markup will apply to all the plans of the same product group, which is also applicable on website and order page. |
Note for Main Company' Partners The partners can also view their product groups, and apply tax group (which can be created in the Tax Master) to the respective product group. Please note that the tax which you apply on any product group will be applicable to all the plans of that product group. |
Home >> Settings >> Products/Services >> Packages >> Product Group
To edit an existing Product Group:
- Click on the Edit icon located in front of the Product Group’s name that you want to edit.
- This will open the Edit Product Group form with details of the Product Group that you want to edit.
- Make desired changes in the Product Group details.
- Click on the Submit button.
Home >> Settings >> Products/Services >> Packages >> Product Group
To delete an existing Product Group:
- Click on the Delete icon located in front of the Product Group’s name that you want to delete.
Active Product Groups cannot be deleted. |
Product Type
Home >> Settings >> Products/Services >> Packages >> Product Type
In the Product Type section, you can define different products within different parents hosting product categories in system - Dedicated Server, VPS, Cloud, Hosting and all other products/services. |
To access the Product Type section:
- Click on the Add Product button in the Packages section.
OR
- Click on the Product Type button in the Product Group section.
Home >> Settings >> Products/Services >> Packages >> Product Type
To add a new Product (Plan) in a Product Type:
- In the Product Type section, there is Add Product Type form in the top section.
- Select a Product Type from dropdown in which new product is being created.
- Enter Name of the Product to be added in the selected Product Type.
- Click on the Submit button.
See sample screenshot of the Product Type section:

Home >> Settings >> Products/Services >> Packages >> Product Type
In the Product Types section, all the Product Types are listed below the Add New Product Type form with details in the below given sequence.
- Name (of the Product)– Product Type
Home >> Settings >> Products/Services >> Packages >> Product Type
To edit an existing Product Type:
- Click on the Edit icon located in front of the Product Type’s name that you want to edit.
- This will open the Edit Product Type form with details of the Product Type that you want to edit.
- Make desired changes in the Product Type details.
- Click on the Submit button.
Home >> Settings >> Products/Services >> Packages >> Product Type
To delete an existing Product Type:
- Click on the Delete icon located in front of the Product Type’s name that you want to delete.
Active Product Types cannot be deleted. |
Automation Platform Express Program Partners The partners of the Automation Platform Express Program can add,edit or delete any product/service plan or product group created by him. He cannot edit the plans of the main company. |


