| Table of Contents | ||
|---|---|---|
|
...
- Click on Save.
See Screenshot:
...
Edit Pricing of an Existing Product Plan
Home >> Settings >> Products/Service >> Packages >> Pricing
...
| Expand | ||
|---|---|---|
| ||
To edit product pricing: - Click on Pricing tab on the Product details page. - This will open the Price Settings window. Here, you can define the Setup Fee of the product and the Price. The prices you set here will be displayed on the order page of the product plan. See Screenshot: 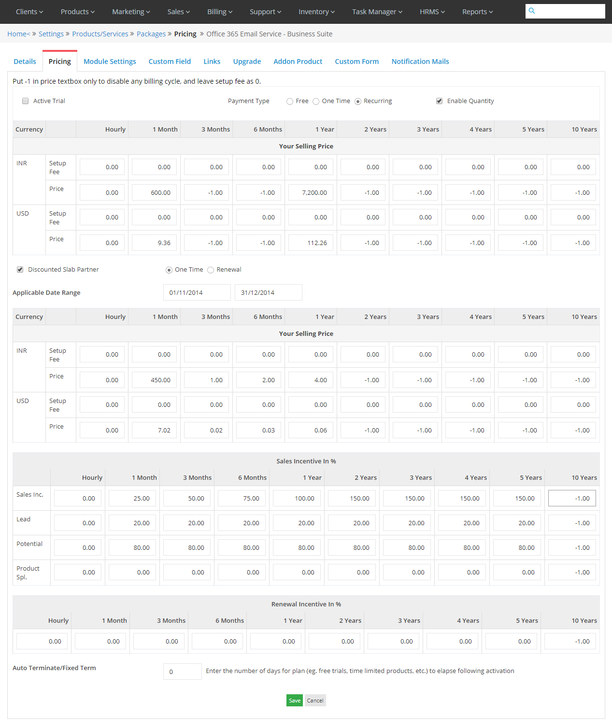
To set discount on a product plan for a fixed period of time: - Click the Discounted Slab Partner check box, yes. - You can select whether it will be provided one-time or on renewal. - Define the Applicable date range of the discount. - Set the discounted price in the provided section.
To define the Incentives on the sale of the selected product plan: - You can define the sales incentive for getting lead, potential and product specialty through this section. - Whatever Sales incentive you will set here, will be displayed under the sales report sections, in each account manager's ledger.
- You can define the Auto-termination of the product plan in days post which the plan will elapse. |
Edit Module Settings
Home >> Settings >> Products/Services >> Packages >> Module Settings
...
| Expand | ||
|---|---|---|
| ||
- Click the Module Settings tab. - This will open the Module Settings of the plan with already filled fields. - Make desired changes. - Select any available option for the automatic setup of the product. - Click on Save. See Screenshot: 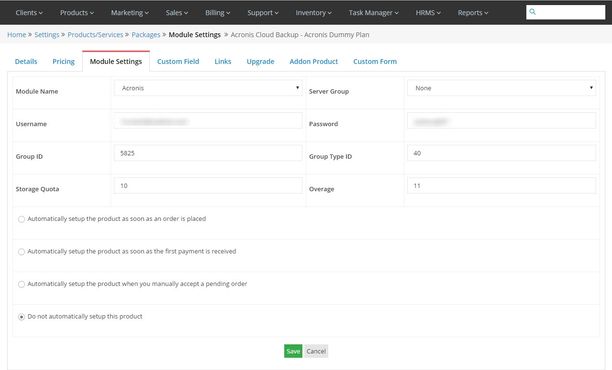 |
Custom Field
Home >> Settings >> Products/Services >> Packages
...
| Expand | ||
|---|---|---|
| ||
- Click the Custom Field tab. - This will open the Custom Fields of the plan. Here the information is displayed in the following format: Order – Field Name – Filed Type – Description – Select Options – Admin Only – Required. See screenshot: 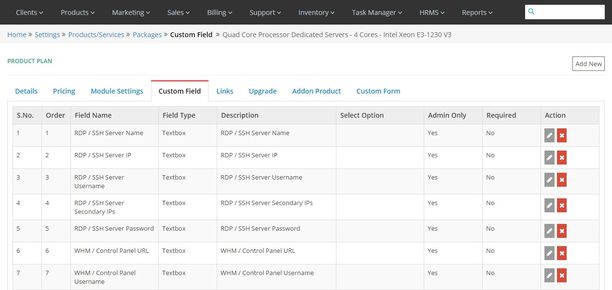
Home >> Settings >> Products/Services >> Packages >> Custom Field - Click the Add New button on the custom field page. - This will open the Add new Custom field window. - Enter the Order no, Field Name, Field Type, and Description. - Select whether Admin can only see it, through the checkbox. - Click on Save. See screenshot: 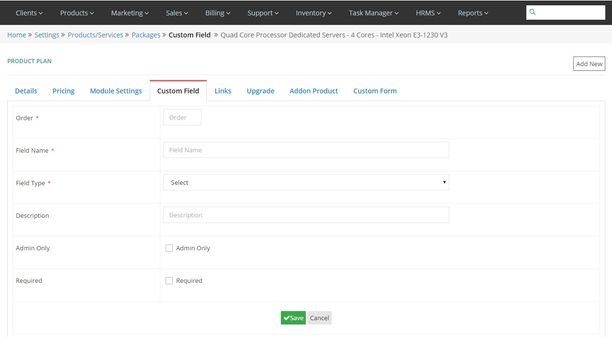
Home >> Settings >> Products/Services >> Packages >> Custom Field - Click the Edit icon located in front of the custom field you want to edit. - This will open the edit Custom Field window with already filled fields. - Make desired changes. - Click on Save.
Home >> Settings >> Products/Services >> Packages >> Custom Field - Click on the Delete icon located in front of the custom field you want to delete. |
View Product Links
Home >> Settings >> Products/Services >> Packages >> Links
...
- Here, you can view all the links associated with a product plan. These links are generated when a customer selects a particular billing cycle.
See Screenshot:
...
Upgrade Product Plan
Home >> Settings >> Products/Services >> Packages >> Upgrade
...
| Expand | ||
|---|---|---|
| ||
- Click on Upgrade tab. - Select the Package Upgrade from the dropdown. - Select the Upgrade mail to be sent from the dropdown. - Click on Save. See screenshot:  |
Addon Product
Home >> Settings >> Products/Services >> Packages >> Addon Product
...
| Expand | ||
|---|---|---|
| ||
- Click on Addon Product tab. - Select the add-on product group from the dropdown. - Select the add-on plans by checking the boxes. - Click on Save. See screenshot:  |
Custom Form
Home >> Settings >> Products/Services >> Packages >> Custom Form
...
| Expand | ||
|---|---|---|
| ||
- Click on Custom Form tab. - Define the Label ie. the field name. - Select the mode through which the label will be displayed, and the client will send the required data in the provided format. - Use the + sign to add more fields, and - to remove fields. - Click on Save. See Screenshot: 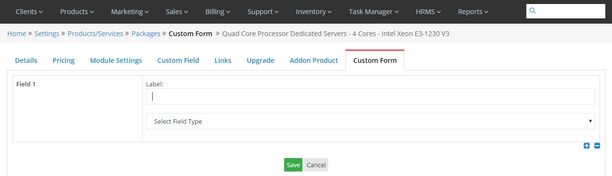 |
Notification mails
| Info |
|---|
In this section, you can select the welcome mail template for the product/service which will be sent to the customer as soon as an order provisioning is done. It will include the entire details of the service. |
...