Communication Templates Settings
- Former user (Deleted)
- Former user (Deleted)
Create & Manage Email Templates
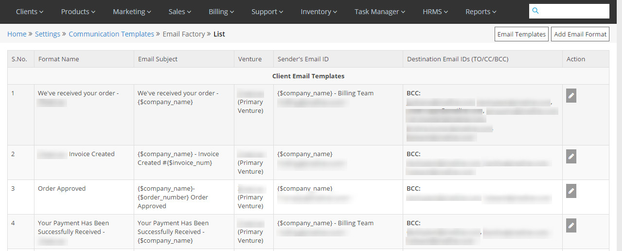
Home >> Settings >> Communication Templates >> Email Factory >> List
In the Email Factory section, you can create and manage the email templates that are sent repeatedly for some defined purposes to your clients or employees.
To access the Email Factory section:
- Go to Settings.
- Click on Email Factory in the Communication Templates section.
In the Email Factory section, the details about each email template is given in the below-given sequence.
- Format Name – Email Subject – Venture – Sender’s Email ID – Destination Email IDs (To/CC/BCC).
See sample screenshot of the Email Factory section:
Create New Email Template
Home >> Settings >> Communication Templates >> Email Factory >> Add Email Template
To create a new Email Template:
- Click on the Email Templates button.
- Click on Add Email Template button on this page. .
- This will open the Add Email Template window, as shown in the screenshot below.
- Select the Venture through the Type dropdown for which the template is being created.
- Enter the Template Name and fill up the other fields.
- Click on the Submit button.
See sample screenshot of the Add Email Template window:

Edit an Email Template
Home >> Settings >> Communication Templates >> Email Factory
To edit an Email Template:
- Click on the Edit icon located in front of the email template that you want to edit.
- This will open the Edit Email Template window.
- Make desired changes in the Email template.
- Click on the Update button.
Delete an Email Template
Home >> Settings >> Communication Templates >> Email Factory
To delete an Email Template:
- Click on the Delete icon located in front of the email template that you want to delete.
Note for Main Company's Partners
The main company's partner can view and edit the existing email templates, but he cannot add any new template.
Edit templates:
Home >> Settings >> Communication templates >> Email factory
To access the templates section in your dashboard:
- Click on Communication template from your admin panel.
- Select Email Factory.
- Select the Edit icon to make changes to any available template.
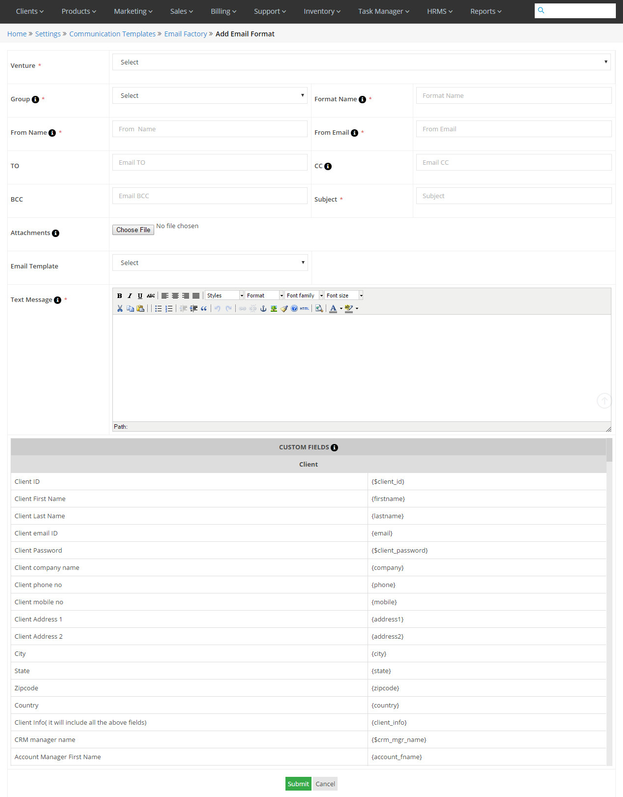
Add Email Format
Home >> Settings >> Communication Templates >> Email Factory >> Add Email Format
In this section, you can add a new format in which emails can be created. For ex, welcome mail format, greeting mail format, suspension mail format and so on
To add a New Email Format:
- Click on Add Email Format in the email factory. Please refer the first screenshot.
- Select the Venture for which you are creating the Email format through the Dropdown menu.
- Fill the Group for which the format is being created by selecting it from the dropdown for ex. Client Email Templates, Billing Email templates etc.
- Define the Format Name for the new format.
- Define the From Name i.e the Sender and his email ID through the From Email section.
- You can also attach files with the help of Attachments' field.
- Select the Email template from the dropdown.
- Define the Text Message.
- Click on Submit.
See a screenshot of the Add Email Format window:
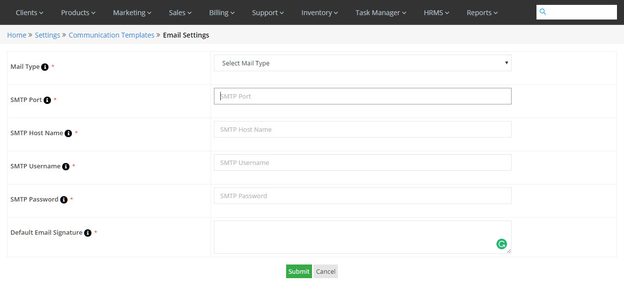
Configure Email Settings
Home >> Settings >> Communication Templates >> Email Settings
In the Email Settings section, you can configure the email settings for sending of emails.
To manage the Email Settings:
- Go to Settings.
- Click on Email Settings in the Communication Templates section.
- Select a mail sending option (PHP/SMTP) from the Mail Type drop down list.
- If you select SMTP, then enter SMTP details.
- Enter the Default Email Signature for adding in the Emails.
- Click on the Submit button.
See sample screenshot of the Email Settings section:
Announcements
Home >> Settings >> Communication Templates >> Announcements
To know how to create and manage Announcements, click here
Knowledgebase Category
Home >> Settings >> Communication Templates >> Knowledgebase Category
To know how to create and manage Knowledgebase category, click here
Knowledgebase Articles
Home >> Settings >> Communication Templates >> Knowledgebase Articles
To know how to create and manage Knowledgebase Articles, click here
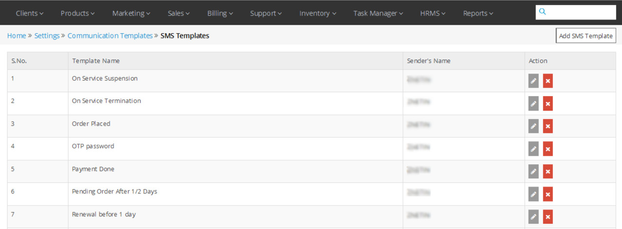
Create & Manage SMS Templates
Home >> Settings >> Communication Templates >> SMS Templates
In the SMS Templates section, you can create and manage the SMS message templates that will be sent repeatedly for some defined purposes to your clients.
To access the SMS Templates section.:
- Go to Settings.
- Click on SMS Templates in the Communication Templates section.
In the SMS Templates section, the details about each SMS template is given in the below given sequence:
- Template Name – Sender’s Name
See sample screenshot of the SMS Templates section:
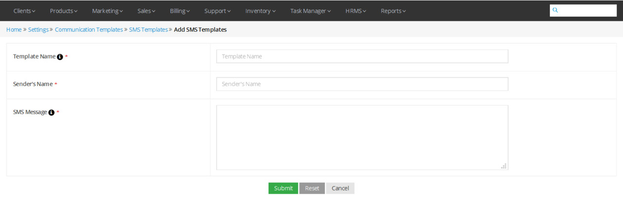
Create New SMS Template
Home >> Settings >> Communication Templates >> SMS Templates >> Add SMS Template
To create a new SMS Template:
- Click on the Add SMS Template button.
- This will open the Add SMS Template window, as shown in the screenshot below.
- Enter the Template Name and Sender’s Name.
- Compose your SMS message.
- Click on the Submit button.
See sample screenshot of the Add SMS Template window:
Edit an SMS Template
Home >> Settings >> Communication Templates >> SMS Templates
To edit an SMS Template:
- Click on the Edit icon located in front of the SMS template that you want to edit.
- This will open the Edit SMS Template window.
- Make desired changes in the SMS template.
- Click on the Submit button.
Delete an SMS Template
Home >> Settings >> Communication Templates >> SMS Templates
To delete an SMS Template:
- Click on the Delete icon located in front of the SMS template that you want to delete.
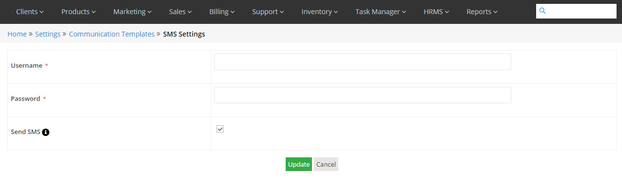
Manage SMS Settings
Home >> Settings >> Communication Templates >> SMS Settings
In the SMS Settings section, you can manage the settings for sending of SMS messages.
To manage the SMS Settings:
- Go to Settings.
- Click on SMS Settings in the Communication Templates section.
- Enter the Username and Password of the server through which SMSs will be sent.
- Tick to enable SMSs to be sent through the system.
- Click on the Save/Update button.
See sample screenshot of the SMS Settings section: