Domain Registrars
- Former user (Deleted)
- Former user (Deleted)
Overview
Home >> Settings >> Products/Services >> Domain Registrars
In the Domain Registrars section, you can activate, deactivate or configure different Domain Registrar modules integrated with the Automation Platform. Any newly integrated Domain Registrar appears here automatically.
To access the Domain Registrars section:
- Go to Settings.
- Select Domain Registrars in the Products/Services section.
In the Domain Registrars section, all the domain registrar modules are listed with following Action buttons.
- Enable –Disable –Configure
See sample screenshot of the Domain Registrars section:
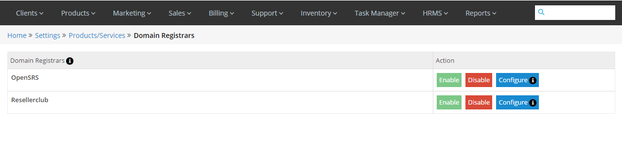
The Automation Platform has included OpenSRS integration in the Domain Registrar module. The functionalities related to Enable, Disable and Configuration of the Domain Registrar module will remain same for both of them.
To Activate a LogicBoxes Domain Registrar Module - OrderBox
- Click on the Enable button located in front of the Domain Registrar module that you want to activate.
To Deactivate a LogicBoxes Domain Registrar Module - OrderBox
- Click on the Disable button located in front of the Domain Registrar module that you want to activate.
To Change Configuration of LogicBoxes Domain Registration Module - OrderBox
- Click on the Configure button located in front of the Domain Registrar module whose configuration you want to change.
- This will open a dropdown window.
Here, you can set or change the following configuration parameters.
- Reseller ID, Password and API Key
- Activate the Test Mode
- Change Nameservers
- Select multiple Tax Groups for this Domain Registrar module
- Enter the UOM (Unit of Measurement) and SAC (Service Accounting Code).
- Click on the Save button to save your changes.
To Manage Domain Renewal Notification Mail Settings
- Click on the Configure button located in front of the Domain Registrar module in which you want to make changes.
The notification mail setting allows you to manage the Domain Renewal Notification sent to the clients.
Here, the admin can do the following:
- Set Number Of Days - The admin can define the number of days on reaching which, the notification mail will be sent to the customer.
- Select the email template group from the drop down.
- Select the mail to be sent.
- Click on save.
- The mail will be shot only if the renewal timeline of the domain lies under any of the mentioned days in the master.
- Positive number of days is set when you just need to send the reminder mail, while if number of days is negative then the client will receive expiration mail.
- The admin can set number of days for the domain according to his requirement through the '+' and '-' icon provided.
- The number of days can be in negative also. For ex: If the number of days is defined to be -1, then the expiration notification mail will be sent to the client after one day of his domain expiry.
- A Domain Notification Cron runs daily which checks number of days from the master above.
- If a client has multiple domains, then a consolidated mail will be shot for all domains which are about to get expired. For Ex: if a client has more than one domain names, and if a number of his domains expire in 25 days, then a mail will be shot including all the domains which will expire in 25 or less than 25 days.
- The admin can set the number of days to be 60,25,15 and 5 to send renewal reminder notifications to clients in case of services. These days are static and cannot be changed.
See sample screenshot of the Domain Registrar Configuration Section:
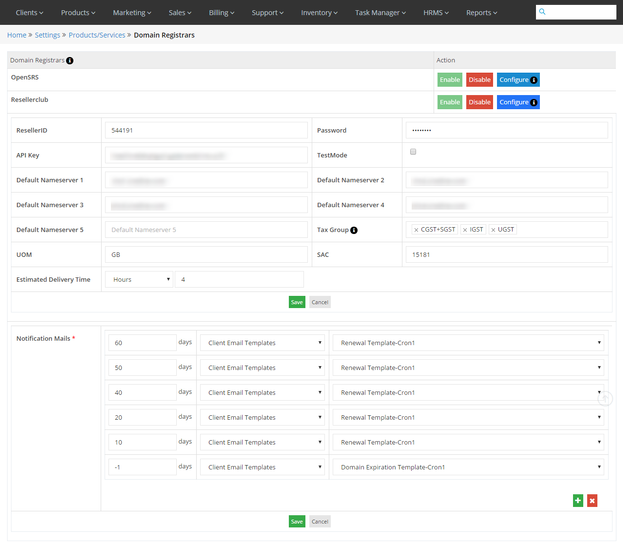
The Estimated Delivery time button allows the admin to add the approximate time when the products or services will be delivered - in days or hours. This will also be displayed in member panel order tracking.
Steps to whitelist the IP for the LogicBoxes and the Automation Platform integration to work
- Login to your Reseller Control Panel.
- In the Menu, point to Settings and then click API.
- Under the Whitelist your IP Addresses section, specify the IP Addresses from where you will be making API requests (Always you need to enter this IP address 103.35.165.176).
- Click the Save Whitelisted IP Addresses button.