Hosting Servers
- Former user (Deleted)
- Former user (Deleted)
Overview
Home >> Settings >> Products/Services >> Hosting Servers
In the Hosting Servers section, you can create, edit and delete the hosting servers and their server groups and login to their respective control panels from here.
To access the Hosting Servers section:
- Go to Settings.
- Select Hosting Servers in the Products/Services section.
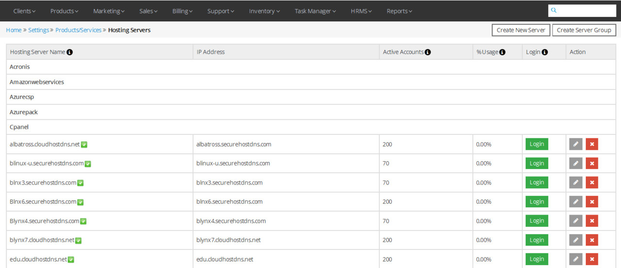
In the Hosting Servers section, the details about all the hosting servers are listed in the below given sequence.
- Hosting Server Name – IP Address – Active Accounts - %Usage – Login
And, details about the Hosting Server Groups are listed with below given details.
- Hosting Server Group – Assigned Server
See sample screenshot of the Hosting Servers section:
Create New Hosting Server
Home >> Settings >> Products/Services >> Hosting Servers >> Create New Server
To create a new hosting server:
- Click on the Create New Server button.
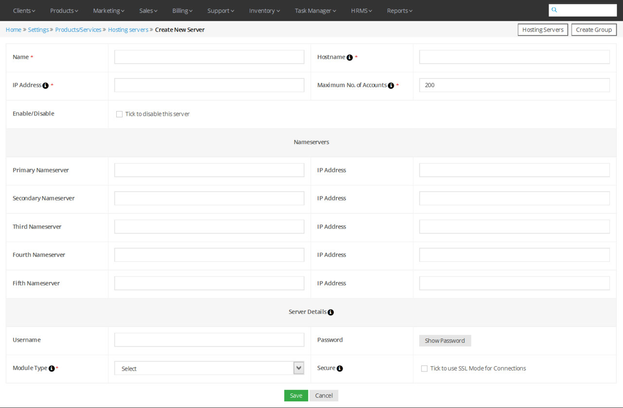
- This will open the Create New Server window, as shown in the screenshot below.
- Enter the New Server Name, Hostname, IP Address and Maximum No. of Accounts on the server.
- Check mark Enble/Disbable box to disable a server.
- Enter different Nameservers and their IP addresses.
- Enter the Username and Password for the server.
- Select a Module type (The dropdown shows all hosting server groups created in the Automation Platform) and tick Secure to use SSL mode for all operations on the server.
- Click on the Save button.
See sample screenshot of the Create New Server section:
Edit Details of a Hosting Server
Home >> Settings >> Products/Services >> Hosting Servers
To edit an existing Hosting Server Details:
- Click on the Edit icon located in front of the Hosting Server’s name that you want to edit.
- This will open the Edit Hosting Server window.
- Make desired changes in the Hosting Server details.
- Click on the Update button.
Delete a Hosting Server
Home >> Settings >> Products/Services >> Hosting Servers
To delete an existing hosting server:
- Click on the Delete icon located in front of the hosting server’s name that you want to delete.
Login to Hosting Server’s Root Shell
Home >> Settings >> Products/Services >> Hosting Servers
To login to Root or Secure Shell of a hosting server:
- Click on the Login button located in front of the respective hosting server’s name.
Create New Hosting Server Group
Home >> Settings >> Products/Services >> Hosting Servers >> Create Server Group
To create a new hosting server group:
- Click on the Create Server Group button.
- This will open the Create Server Group window, as shown in the screenshot below.
- Enter the Name of the New Hosting Server Group.
- Select a server from the dropdown list to assign to the new hosting server group.
- Click on the Save button.
See sample screenshot of the Create Server Group section:

Edit Details of a Hosting Server Group
Home >> Settings >> Products/Services >> Hosting Servers
To edit an existing Hosting Server Group:
- Click on the Edit icon located in front of the Hosting Server Group’s name that you want to edit.
- This will open the Edit Hosting Server Group window.
- Make desired changes in the Hosting Server Group details.
- Click on the Update button.
Delete a Hosting Server Group
Home >> Settings >> Products/Services >> Hosting Servers
To delete an existing hosting server group:
- Click on the Delete icon located in front of the hosting server group’s name that you want to delete.